Garage
There is a small structure to the rear and side of the prototype “T-House”. It is likely just a shed although constructed of cut rock. There does not appear to be any hint of a door on the side appropriate for an automobile but the size of the building is similar to that of early 1900s automobile garages – several still existing in the region – so modeller’s license was applied and the structure adapted to be just that – an early 1900s garage for the fancy new automobile.
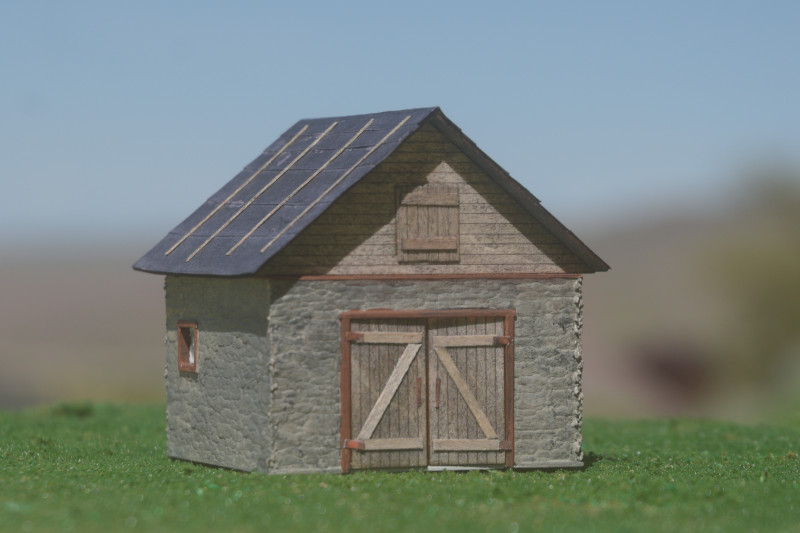
The garage is a mix of 3D-printed walls and wood. The walls are intended to be of rock construction. There is a single resin window. The doors, gables, roof, and trim are all basswood.
The walls should be painted to reflect field rocks of a base color reflecting the region the model is to occupy.
The pre-production model was painted with a base wash of FolkArt’s “Barnwood” sloppily applied. Let the base coat thoroughly dry before applying additional coats. Various washes of various grays and lighter browns – 1:3 – 1:2 alcohol or water to paint – were sloppily applied until a desired color variation of the walls was achieved. 4 or 5 coats of thin washes may be sufficient.
The front and back door frames printed into the walls should be painted before the doors are added. The door sills are concrete or wood and should be painted to reflect this. There is also a wood frame printed along the top of the walls that should be painted.
The window should also be painted. The frame is intended to represent an iron frame. Flat black or white would be typical colors although any color is acceptable.
Glazing for the window may be a small piece of acetate sheet but seems more effective if a clear glue is applied between the panes and allowed to dry. Canopy 560 is one possible choice for this; apply the glue from the inside of the window and let dry until clear. Canopy 560 is also appropriate for gluing acetate to wood or resin.
Put glue along the edges of the window and place into the opening from the inside.
The wood of the proof model was treated with several washes of black ink mixed with alcohol (AI). A mix of 1 teaspoon ink (such as Higgins 46030 non-waterproof black ink) to 1 pint alcohol is a good starting mixture. Paint or wood stains such as Minwax are also possible treatment options.
The main door comes in two pieces; they open from the sides. The Z-bracing made of 1x6s. Strap hinges – very thin pieces of paper painted flat black and perhaps touched with a thin wash of “Rust” or orange – are placed on the horizontal portions of the brace hold the door in place – the doors open outwards and may be fastened in that position if desired.
The back door is also made of 1x6s. It does not have visible bracing. It would open inward and is mounted on the inside of the framework
Using a straightedge, the front and rear gables fit on the framework at the top of the walls. The draft model has the gables mounted on the inside edges of the walls. Measure the distance between the gables and fit a section of 12×12 stripwood between them near the peak. The beam should not fit above the gable edges.
The loft door is assembled from 1×6 stripwood cut to a length just larger than the opening. Two 1×6 cross-braces are added. The door may be placed closed or open.
When all is prepared and ready, place the two roof halves in place. When dry, roofing should be applied. The pre-production model used tarpaper as roofing. Scale 3ft wide strips of ordinary plain white paper were placed from the bottom using Aleens Tacky Glue. A strip of the same was folded over the ridgeline.
The roof was then “painted” with BIA wash (The ink was black shoe dye in alcohol for the pre-production model). The first several coats don’t look right but after several applications, the desired washed-out and mottled “black” was acquired.
Eight strips of 1×3 placed across the tarpaper were first washed with an initial coat of brown, then 3 or 4 washes of black and then put into place using Aleens Tacky Glue.
Not included, but a 6×6 or 8×8 beam could be mounted above the loft door to support a pulley for hauling items up from the outside.
That’s it … we hope you enjoyed constructing this little building.